This is a partially lined black silk jacket from Burda's July 2013 issue. It is also a sewing course in the mag. It calls for Natte' fabric...what the heck? Hart's Black Silk Noil is what I used and it is quite nice. The shiny black binding is a black silk charmeuse also from Hart's.
I'm not sure I can do a proper review on this jacket, because I just don't do a lot of lined jackets. I live in Texas and it is not often that I even need outerwear. The jacket took more time than I expected but I think that is because I really needed better instructions than what the magazine offered. Burda mag instructions even on a sewing course is just confusing. I am so glad I did this jacket because it is one sexy beast. I made it for myself and the 17yo DD will not unhand it.
Here are a few pics on my dress form that is actually too big now. I have lost quite a bit of weight and my dress form is just a smidge too big now which is why the front does not meet in the pics. The weight loss is for health reasons, so all is good.
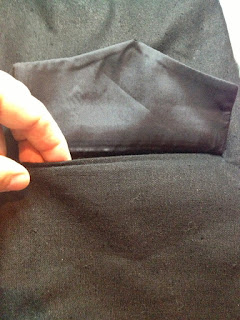
Double welt pockets with flaps! I loved making these.
OK, I did not make this jacket for her, but she is a greedy little thing and looks quite cute in it. I will put some thin shoulder pads in it for her. My shoulders are larger and more square than hers and it was made for ME. :)
Pattern adjustments and advice: When I made the muslin, the only change I made was to narrow the back at the center seam below the shoulder blades. I have a narrow back, so this is not unusual. Ditch the partial lining pieces and just redraft a full lining for this one. If you don't know how, I think there are a few good sites and books for this. (What I should have done). I also should have figured out how to miter corners before I tore into the binding issue. I just winged it and that is just not very satisfying. Burda does not cover this very well in the directions and I would look into this if you are not familiar with that.
This is downloadable on the Burdastyle website here.
Thanks for reading!
Claire
Thursday, September 26, 2013
Saturday, September 7, 2013
Sleeve Cap Ease - What to do!
Ok, I am patiently waiting for my little wheel to come in from the manufacturers. It had some glitches that had to be fixed. I have been so excited about having something to measure armholes and sleeve heads because frankly I have been skipping that bit of information when I prepare my patterns. Trying to hold a tape measure on a stitching line or one of those flexible rulers is a pain in the butt. Plus, as you know, I love me some European pattern drafting. Have you noticed that the big 4 has a lot of sleeve cap ease? I love knit tops and I'm sorry but you just shouldn't do a bunch of sleeve cap ease with knits. It is just wrong.
Here are some of the highlights of information that I found in short form:
Zero Ease:
Fashion Incubator: You do not need any ease if you are willing to redraft the sleeve head to be anatomically correct which is "difficult and time-consuming" Well, I guess I will do some ease then.
1/2 Inch to 1 1/2 Inches:
Madalynn has a lot of nice information on her blog about sleeve ease. I will make her info super short, so you may want to double check her blog.
1 to 1.5 inches of ease for Jackets
1/2"to 3/4" for knits
Less for leather
Silhouettes that need more ease are tailored jackets.
Silhouettes that need less ease are drop shoulder styles.
Very soft fabric may need less ease so it does not pucker.
I'll keep adding to this as I find more information. Feel free to comment and correct me if you want.
Do you drop the sleeve cap height to remove the ease or do you redraft the sleeve?
Have a lovely weekend!!
Claire
Subscribe to:
Comments (Atom)


